<重新定义 SpringCloud 实战>笔记
 times read
Contents
组件
| 组件 | 项目 | 分类 |
|---|---|---|
| eureka | spring-cloud-netflix | 注册中心 |
| zuul | spring-cloud-netflix | 第一代网关 |
| sidecar | spring-cloud-netflix | 多语言 |
| ribbon | spring-cloud-netflix | 负载均衡 |
| hystrix | spring-cloud-netflix | 熔断器 |
| turbine | spring-cloud-netflix | 集群监控器 |
| feign | spring-cloud-openfeign | 声明式 http 客户端 |
| consul | spring-cloud-sonsul | 注册中心 |
| gateway | spring-cloud-gateway | 第二代网关 |
| sleuth | spring-cloud-sleuth | 链路追踪 |
| config | spring-cloud-config | 配置中心 |
| bus | Spring-cloud-bus | 总线 |
| pipeline | spring-cloud-pipeline | 部署总线 |
| dataflow | spring-cloud-dataflow | 数据处理 |
配置中心
Server 端特点
- HTTP 协议, 外部配置基于资源 API
- 加密, 解密属性值(对称或非对称)
- 开箱即用, 通过 Spring Boot 应用中使用
@EnableConfigServer
Client 端特点
- 绑定到 Config Server 并通过远程的属性资源来初始化 Spring 的
Environment - 加密, 解密属性值(对称或非对称)
bootstrap 文件
它类似 application.properties 文件, 但 bootstrap.properties 属于一个应用的 bootstrap 阶段.
server
默认监听端口为 8888
pom
<dependency>
    <groupId>org.springframework.cloud</groupId>
    <artifactId>spring-cloud-config-server</artifactId>
</dependency>
存储策略
默认是用 git 来保存的. 配置位置为 spring.cloud.config.server.git.uri
初始化一个 git server :
git init –bare —shared .
git 的 url 可以使用 placeholder
https://github.com/myorg/{application}{application}{profile}{label}
注意, 不是 ${}
还可以按模式匹配. 参考 Pattern Matching and Multiple Repositories
资源定位规则
/{application}/{profile}[/{label}]
/{application}-{profile}.yml
/{label}/{application}-{profile}.yml
/{application}-{profile}.properties
/{label}/{application}-{profile}.properties
{application}: 对应于客户端的spring.application.name{profile}表示激活的 profile(或逗号分隔的 profile 列表). 对应于客户端的spring.profiles.active(也可逗号分隔的列表)${label}是一个可选的服务器端的 git 标签. 默认为master, 相当于版本号
client
默认连接的 server 地址为 http://localhost:8888
可以通过在 bootstrap.[yml|properties] 文件中的 spring.cloud.config.uri 属性来指定 server 地址
client 中的属性值可以从本地环境或 config server 中获取. 默认情况下, config server 的优先级更高. 即
config server > local
pom
<dependency>
    <groupId>org.springframework.cloud</groupId>
    <artifactId>spring-cloud-starter-config</artifactId>
</dependency>
指定 server
在 bootstrap.properties 文件中
# 可以为多个, 逗号分隔开
spring.cloud.config.uri=http://localhost:8888
spring.application.name=myapp
这样子, 它就会从 server 中的读取以下文件.
/myapp/{profile}[/{label}]
/myapp-{profile}.yml
/{label}/myapp-{profile}.yml
/myapp-{profile}.properties
/{label}/myapp-{profile}.properties
加/解密
注意, 全功能的话需要下载 JVM 的 JCE 文件.
添加 keystore
keytool -genkeypair -alias mytestkey -keyalg RSA \
  -dname "CN=Web Server,OU=Unit,O=Organization,L=City,S=State,C=US" \
  -keypass changeme -keystore server.jks -storepass letmein
然后将 server.jks 文件放到 server 的 classpath 下面.
然后可以通过 curl 测试
加密
curl -i -X POST http://localhost:8888/encrypt -d mysecret
HTTP/1.1 200
Content-Type: text/plain;charset=UTF-8
Content-Length: 388
Date: Thu, 14 Mar 2019 09:09:55 GMT

AQAD1xSE+ETByGVK2UmYTXwtUb0YQSBDHzYmkFvKREdw6sQcOl5EZ/bkmCFggQvBBsqAPbIUjKpL12SuexddKZA4CnFlpCmDvw7ZPQXwKunCrH0GAM3VN21C9Wyv9cqclM6SCWnZ9GtuAZlutYaSyCrnG7WSu5m68QI+0iDufRawDlUVEA5LrraD9t+uyL0fzhDIOAAmCLGpciLEVILT3IMFOc2QZOKBztU5cqnE6/5HlcXEP1L+3juMj0W4PUqkgcHDNZa5OFuftXNTmyx04pRjzPyeLWMv68xdl82Mr+rO9nIdxZejt/tppUCAONhIcm7uJZyOItqWZ1KPoH7x1Uy0/7o5RbHjRra/zhOjkR/pigt0j+5Mis7C0RszK+z5qak=


解密
curl -i -X POST http://localhost:8888/decrypt -d "AQBUcpq/8PnmGpuNDlml7sIFHoCWxax1ZQWwrLKTgKv/a6boWslHN7cqaPm/82M0A3qY5CmXU7V1stZxo0cC0I+uCsFCAUypJu7dexSQ4pMvcFdcvdLfQNzJIptnO4pDuXohTOGJISUbInEAcEwgxFUNSWt1WU8YpayXrCRIsFG8dLrfYuT5HtriTAuOHVhMLLgvkhkDQFpPOMLvU+UNsBBi2AFN7tdAQXvkVL0PgpTc7PkRzDQO4aRebXNR2kr5ZIROtv9rovvcYxwx+tfK1lHabUjKLqr7VxaDusZYV/z6qwXcJDLGIvN2oZt/0lgcc4FvDXK+wpUYJ9a/jvfwL1nz7lb2zl7b8BivWFSJ/3RbyQrCxT4SMXMNXZcBou2rP4c="
HTTP/1.1 200
Content-Type: text/plain;charset=UTF-8
Content-Length: 8
Date: Thu, 14 Mar 2019 09:10:24 GMT

mysecret
在 properties 文件中使用
格式为 key={cipher}加密后的内容
hello.demo={cipher}AQBUcpq/8PnmGpuNDlml7sIFHoCWxax1ZQWwrLKTgKv/a6boWslHN7cqaPm/82M0A3qY5CmXU7V1stZxo0cC0I+uCsFCAUypJu7dexSQ4pMvcFdcvdLfQNzJIptnO4pDuXohTOGJISUbInEAcEwgxFUNSWt1WU8YpayXrCRIsFG8dLrfYuT5HtriTAuOHVhMLLgvkhkDQFpPOMLvU+UNsBBi2AFN7tdAQXvkVL0PgpTc7PkRzDQO4aRebXNR2kr5ZIROtv9rovvcYxwx+tfK1lHabUjKLqr7VxaDusZYV/z6qwXcJDLGIvN2oZt/0lgcc4FvDXK+wpUYJ9a/jvfwL1nz7lb2zl7b8BivWFSJ/3RbyQrCxT4SMXMNXZcBou2rP4c=
@Value("${hello.demo}")
private String helloDemo;

@GetMapping("/values")
public Object getValues() {
    return helloDemo;
}
访问后, 即可看到是解密后的 mysecret 了.
client 端会自动解密后使用.
服务发现
单机 : 直接通过域名调用
SOA
- Client 通过 nginx 配置服务方的 upstream ip
- 服务方对外统一暴露一个域名, 然后在自己的 nginx 里配置 upstream ip [better]
微服务
- 更新 nginx 配置文件, 然后 reload 或
nginx_http_dyups_module来动态修改 upstream 而不需要 reload - 通过服务注册中心来处理
- 更新 nginx 配置文件, 然后 reload 或
eureka
- 使用 Peer to Peer 的复制模式
zone 及 region
Region : 代表一个独立的地理区域.
AvailabilityZone : 相当于不同区域下的机房.
默认情况下, 资源不会在 region 之间复制. 主要是在 region 下面的 AvailabilityZone 复制.
自我保护机制
SELF PRESERVATION , 用于防止网络偶尔抖动或暂不可用造成服务实例存活的误判.
通过当前注册实例数, 计算每分钟应该从应用实例接收到的心跳数, 如果最近一分钟接收到的续约的次数 <= 指定的阈值的话, 则关闭租约失效剔除, 禁止定时任务剔除失效的实例, 从而保护注册信息.
client
pom
<dependency>
    <groupId>org.springframework.cloud</groupId>
    <artifactId>spring-cloud-starter-netflix-eureka-client</artifactId>
</dependency>
application.properties
eureka.client.service-url.defaultZone=http://localhost:8761/eureka/
配置
当 spring-cloud-starter-netflix-eureka-client 在 classpath , 就有
eureka.instance.前缀的配置属性(表示注册者自身). 配置了spring.application.name之后 , 用默认的值一般就已经足够了.(spring.application.name表示 eureka 服务的 ID 或 VIP)eureka.client.前缀的配置属性(可以查询注册器去定位其他服务)
禁用 client
eureka.client.enabled=false
# 当 spring.cloud.discovery.enabled 为 false , 也会禁用 client
认证
eureka.client.service-url.defaultZone=http://user:password@localhost:8761/eureka
使用 EurekaClient
不要在 @PostConstruct 或 @Scheduled 方法中使用它. 它是在 SmartLifecycle 中初始的.
@Autowired
private EurekaClient discoveryClient;

public String serviceUrl() {
    InstanceInfo instance = discoveryClient.getNextServerFromEureka("STORES", false);
    return instance.getHomePageUrl();
}
zone
当 client 部署在多个不同地区时, 你可以想这些 client 优先使用在同一个地区的服务. 可以这样子设置
# service1 , zone1
eureka.instance.metadataMap.zone = zone1
eureka.client.preferSameZoneEureka = true

# service2 , zone2
eureka.instance.metadataMap.zone = zone2
eureka.client.preferSameZoneEureka = true
server
pom
<dependency>
    <groupId>org.springframework.cloud</groupId>
    <artifactId>spring-cloud-starter-netflix-eureka-server</artifactId>
</dependency>
@SpringBootApplication
@EnableEurekaServer
public class Application {

    public static void main(String[] args) {
        new SpringApplicationBuilder(Application.class).web(true).run(args);
    }

}
standalone 模式
server.port=8671

eureka.instance.hostname=localhost
# 设置为 false, 因为它是 server, 不用注册
eureka.client.register-with-eureka=false
eureka.client.fetch-registry=false

eureka.client.service-url.defaultZone = http://${eureka.instance.hostname}:${server.port}/eureka/

eureka.server.wait-time-in-ms-when-sync-empty=0
eureka.server.enable-self-preservation=false

management.endpoints.web.exposure.include=*
peer 模式
即
server1 的 eureka.client.service-url.defaultZone, 设置为 server2
server2 的 eureka.client.service-url.defaultZone, 设置为 server1
server 1
server.port=8000
spring.profiles=server1
eureka.instance.hostname=localhost
eureka.client.service-url.defaultZone = http://server2/eureka/
management.endpoints.web.exposure.include=*
server2
server.port=8001
spring.profiles=server2
eureka.instance.hostname=localhost
eureka.client.service-url.defaultZone = http://server1/eureka/
management.endpoints.web.exposure.include=*
security 中 为 /eureka 禁止 CSRF
@EnableWebSecurity
class WebSecurityConfig extends WebSecurityConfigurerAdapter {

    @Override
    protected void configure(HttpSecurity http) throws Exception {
        http.csrf().ignoringAntMatchers("/eureka/**");
        super.configure(http);
    }
}
OpenFeign
声明式 HTTP 客户端.
使用
package com.github.feign.demo;

import org.springframework.beans.factory.annotation.Autowired;
import org.springframework.boot.CommandLineRunner;
import org.springframework.boot.SpringApplication;
import org.springframework.boot.autoconfigure.SpringBootApplication;
import org.springframework.cloud.openfeign.EnableFeignClients;

@SpringBootApplication
@EnableFeignClients
public class DemoApplication implements CommandLineRunner {

    public static void main(String[] args) {
        SpringApplication.run(DemoApplication.class, args);
    }

    @Autowired
    private HelloService helloService;

    @Override
    public void run(String... args) throws Exception {
        String result = helloService.search("dubbo");
        System.out.println(result);
    }
}
声明式接口
package com.github.feign.demo;

import org.springframework.cloud.openfeign.FeignClient;
import org.springframework.web.bind.annotation.RequestMapping;
import org.springframework.web.bind.annotation.RequestMethod;
import org.springframework.web.bind.annotation.RequestParam;

@FeignClient(name = "hello-client", url = "https://api.github.com", configuration = HelloServiceConfig.class)
public interface HelloService {
    @RequestMapping(value = "/search/repositories", method = RequestMethod.GET)
    String search(@RequestParam("q") String query);
}
服务配置
package com.github.feign.demo;

import feign.Logger;
import org.springframework.context.annotation.Bean;
import org.springframework.context.annotation.Configuration;

@Configuration
public class HelloServiceConfig {
    @Bean
    public Logger.Level feignLoggerLevel() {
        return Logger.Level.FULL;
    }
}
配置
FeignClient 注解
- name
- url
- configuration : 配置类, 可以自定义 Feign 的 Encoder, Decoder, LogLevel 等
- fallback : 容错处理
- path : 定义当前 FeignClient 的统一前缀
当然, 配置类也可以用配置文件来配置. 如下
fiegn.client.config.[feignName].xxx
全局默认配置:
@EnableFeignCleints 注解有个属性 defaultConfiguration , 这个可以设置全局默认的 feign 配置.
默认情况下. 属性文件的配置优先级 > Java 代码里的配置. 可以通过 feign.client.default-to-properties=false 来改变.
gzip
在 application.properties 中加入
feign.compression.request.enabled=true
feign.compression.request.mime-types=text/xml,applicatin/xml,application/json
feign.compression.request.min-request-size=2048
feign.compression.response.enabled=true
这时, 服务接口类的返回值应该用 ResponseEntity<byte[]>
@FeignClient(name = "hello-client", url = "https://api.github.com", configuration = HelloServiceConfig.class)
public interface HelloService {
    @RequestMapping(value = "/search/repositories", method = RequestMethod.GET)
    ResponseEntity<byte[]> search(@RequestParam("q") String query);
}
日志
第一步: 在配置文件中配置
logging.level.完全包限制名.类名=debug
第二步: 配置日志 bean
@Configuration
public class HelloServiceConfig {
    @Bean
    public Logger.Level feignLoggerLevel() {
        return Logger.Level.FULL;
    }
}
第三步: 相应的 FeignClient 上关联这个 Configuration
超时
- robin
- hystrix
替换 client 的实现
默认情况下, feign 使用 JDK 原生的 URLConnection 来处理 HTTP 请求
http client
pom
<dependency>
    <groupId>org.apache.httpcomponents</groupId>
    <artifactId>httpclient</artifactId>
</dependency>

<dependency>
    <groupId>com.netflix.feign</groupId>
    <artifactId>feign-httpclient</artifactId>
    <version>8.17.0</version>
</dependency>
application.proerpies
feign.httpclient.enabled=true
ok http
<dependency>
    <groupId>io.github.openfeign</groupId>
    <artifactId>feign-okhttp</artifactId>
</dependency>
application.properties
feign.httpclient.enabled=false
feign.okhttp.enabled=true
负载均衡
Ribbon
- 服务端负载均衡
- nginx
- F5
- 客户端负载均衡
- ribbon
使用
要开启服务发现
pom
    <dependencies>
        <dependency>
            <groupId>org.springframework.cloud</groupId>
            <artifactId>spring-cloud-starter-netflix-eureka-client</artifactId>
        </dependency>
        <dependency>
            <groupId>org.springframework.cloud</groupId>
            <artifactId>spring-cloud-starter-netflix-ribbon</artifactId>
        </dependency>
        <dependency>
            <groupId>org.springframework.boot</groupId>
            <artifactId>spring-boot-starter-web</artifactId>
        </dependency>
        <dependency>
            <groupId>org.springframework.boot</groupId>
            <artifactId>spring-boot-starter-test</artifactId>
            <scope>test</scope>
        </dependency>
    </dependencies>
application.properties
eureka.client.service-url.defaultZone=http://localhost:8000/eureka/
management.endpoints.web.exposure.include=*
server.port=7777
spring.application.name=robbin-demo
application
要开启服务发现. @EnableDiscoveryClient
import org.springframework.boot.SpringApplication;
import org.springframework.boot.autoconfigure.SpringBootApplication;
import org.springframework.cloud.client.discovery.EnableDiscoveryClient;
import org.springframework.cloud.client.loadbalancer.LoadBalanced;
import org.springframework.context.annotation.Bean;
import org.springframework.web.client.RestTemplate;

@SpringBootApplication
@EnableDiscoveryClient
public class RibbonDemoApplication {

    public static void main(String[] args) {
        SpringApplication.run(RibbonDemoApplication.class, args);
    }

    @Bean
    @LoadBalanced
    public RestTemplate restTemplate() {
        return new RestTemplate();
    }

}
调用服务
import org.springframework.beans.factory.annotation.Autowired;
import org.springframework.web.bind.annotation.GetMapping;
import org.springframework.web.bind.annotation.RestController;
import org.springframework.web.client.RestTemplate;

@RestController
public class TestController {
    @Autowired
    private RestTemplate restTemplate;

    @GetMapping("/add")
    public String add(int a, int b) {
        String result = restTemplate.getForObject("http://eureka-client/query/add?a=" + a + "&b=" + b, String.class);
        System.out.println(result);
        return result;
    }
}
注意, 调用服务的 URL 是写注册服务时的应用名即可. 即
http://服务端的 ${spring.application.name}/path?parameter...
均衡策略
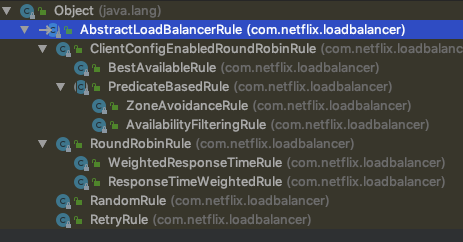
- RandomRule : 随机策略
- RoundRobinRule : 轮询策略
- RetryRule : 重试策略
- BestAvailableRule : 最低并发策略
- AvailabilityFilterRule : 可用过滤策略
- 过滤掉一直连接失败并标记为 circuit tripped 的 server
- 过虑掉高并发连接的 server (active connections 超过阈值)
- ResponseTimeWeightedRule : 根据 server 响应时间来分配权重. 响应时间越小, 权重越大. 已废弃. 建议用 WeightedResponseTimeRule.
- WeightedResponseTimeRule : 新版本
超时与重试
服务名.ribbon.ConnectionTimeout=30000
服务名.ribbon.ReadTimeout=30000
服务名.ribbon.MaxAutoRetries=1
服务名.ribbon.MaxAutoRetriesNextServer=1
服务名.ribbon.OkToRetryOnAllOperations=true
饥饿加载
即启动的时候, 就加载配置项的应用上下文. 默认是第一次调用的时候才加载.
ribbon.eager-load.enabled=true
ribbon.eager-load.clients=服务名1,服务名2
脱离 eureka 使用
默认情况下, ribbon 会从 eureka 注册中心中读取服务注册列表. 但也可以使用指定源服务地址
ribbon.eureka.enabled=false
${client}.ribbon.listOfServers=http://host1:port, http://host2:port
注意, ${client} 表示对应于提供微服务的服务名. 即对应提供服务的项目里的 spring.application.name 的名字
熔断器 Hystrix
<dependencies>
    <dependency>
        <groupId>org.springframework.cloud</groupId>
        <artifactId>spring-cloud-starter-netflix-eureka-client</artifactId>
    </dependency>
    <dependency>
        <groupId>org.springframework.cloud</groupId>
        <artifactId>spring-cloud-starter-netflix-hystrix</artifactId>
    </dependency>
</dependencies>
@SpringBootApplication
@EnableHystrix
@EnableDiscoveryClient
public class ClientApplication {

    public static void main(String[] args) {
        SpringApplication.run(ClientApplication.class, args);
    }
}
@Component
public class UserService implements IUserService{

    @Override
    @HystrixCommand(fallbackMethod="defaultUser")
    public String getUser(String username) throws Exception {
        if(username.equals("spring")) {
            return "This is real user";
        }else {
            throw new Exception();
        }
    }

     /**
      * 出错则调用该方法返回友好错误
      * @param username
      * @return
      */
     public String defaultUser(String username) {
        return "The user does not exist in this system";
     }

}
feign 中使用熔断器
# 关闭熔断器
feign.hystrix.enabled=false
# 开启熔断器
feign.hystrix.enabled=true
开启后:
@FeignCleint(name="xxx", fallback=xxxFallback.class)
这样子, 当服务不可用时, 会降级为调用 xxxFallback.class 的实现方法了.
Dashboard
<dependency>
    <groupId>org.springframework.cloud</groupId>
    <artifactId>spring-cloud-starter-netflix-hystrix-dashboard</artifactId>
</dependency>
<dependency>
    <groupId>org.springframework.cloud</groupId>
    <artifactId>spring-cloud-starter-netflix-eureka-client</artifactId>
</dependency>
@SpringBootApplication
@EnableDiscoveryClient
@EnableHystrixDashboard
public class HystrixDashboardApplication {

    public static void main(String[] args) {
        SpringApplication.run(HystrixDashboardApplication.class, args);
    }

}
然后访问 http://localhost:9000/hystrix
网关 Zuul
使用
<dependencies>
    <dependency>
        <groupId>org.springframework.cloud</groupId>
        <artifactId>spring-cloud-starter-netflix-zuul</artifactId>
    </dependency>
    <dependency>
        <groupId>org.springframework.cloud</groupId>
        <artifactId>spring-cloud-starter-netflix-eureka-client</artifactId>
    </dependency>
</dependencies>
bootstrap.properties
spring.application.name=zuul-server
server.port=5555
eureka.client.service-url.defaultZone=http://localhost:8000/eureka/,http://localhost:8002/eureka/
zuul.routes.${serviceId}.path=/xxx/**
# 以下可不配置. 默认就是这样子的
zuul.routes.${serviceId}.serviceId=${serviceId}
简化版
# 这样子相当于
#zuul.routes.${serviceId}.path=/${serviceId}/**
#zuul.routes.${serviceId}.serviceId=${serviceId}
zuul.routes.${serviceId}=
指定 url
zuul.routes.${serviceId}.path=/xxx/**
# 以下可不配置. 默认就是这样子的
zuul.routes.${serviceId}.url=http://host:port
${serviceId} 即服务提供者的 ${spring.application.name}
这样子, 表示访问网关 http://localhost:5555/xxx/** 的请求, 全部会转发到 http://${serviceId}/** 里去(注意, 没有 /xxx 了的).
启动类
import org.springframework.boot.SpringApplication;
import org.springframework.boot.autoconfigure.SpringBootApplication;
import org.springframework.cloud.client.discovery.EnableDiscoveryClient;
import org.springframework.cloud.netflix.zuul.EnableZuulProxy;

@SpringBootApplication
@EnableDiscoveryClient
@EnableZuulProxy
public class ZuulServerApplication {

    public static void main(String[] args) {
        SpringApplication.run(ZuulServerApplication.class, args);
    }
}
路径匹配符
/**任意数量的路径与字符/*任意数量的字符/?单个字符
路由前缀
zuul.prefix=/pre
这样子的话, 访问 zuul 的 path 时要加上 /pre 前缀.
服务屏蔽
zuul.ignored-services=${serviceId}
重定向
zuul.add-host-header=true
重试
zuul.retryable=true
# 同一个服务重试次数
ribbon.MaxAutoRetries=1
# 切换相同服务数量
ribbon.MaxAutoRetriesNextServer=1
zuul 中 filter 生命周期
- pre
- route
- post
- error
请求之间是通过 RequestContext 来通信
自定义 filter
继承 ZuulFilter .
- filterType() : 设定 filter 类型. pre, route, post, error 等. 可用 FilterConstants
- int filterOrder()
- boolean shouldFilter()
- Object run()
然后将它注入到 Spring 容器 :
@Bean
public YourFilterType yourFilterType() {
    return new YourFilterType();
}